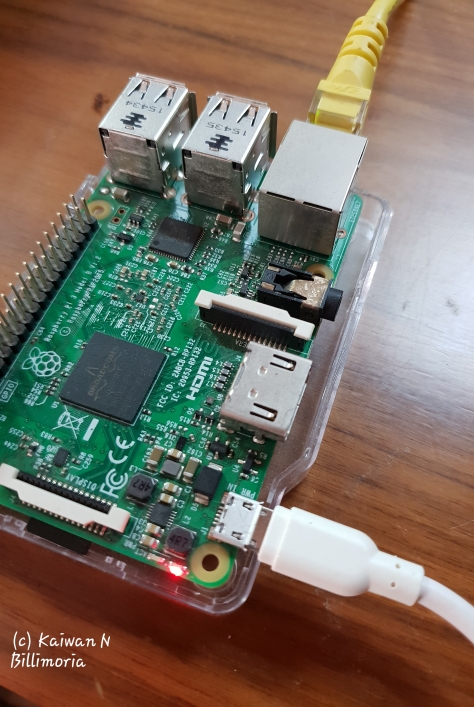
The Raspberry Pi (I’m currently using the R Pi 3 Model B+) is a fantastic embedded Linux prototyping and development platform for hobbyists and tinkerers.
However, one of the thing that bugs me about it – by default, one can either hook it up to to a digital monitor or TV via HDMI (not ideal for developers, not for me at least!), or, much better, attach it to your local router via ethernet RJ45 cable and log in to it over ssh(1) from your laptop.
(My other pet grudge against the R Pi is the completely closed bootloader; why can’t we just install and use U-Boot!?; can we? EDIT: yes we can indeed! The Yocto Project makes it easy to do…).
Another key point: for a long while I was using an inappropriate power supply and, for the lack of one, was destroying my (micro)SD cards! Using a proper “known to work” power supply for the R Pi is critical; I now use a “Elementz Engineers Guild 5V 3A USB to MicroUSB Charger for Raspberry Pi 3 Model B/RPi 2 Model B/B+/A+ (White)” power supply (purchased from Amazon India) and it works just great.
Why a Linux Console
So, while the ssh login is fine for most purposes, there are circumstances where there is no alternative but to have a Linux console device available right from boot up. Typical reasons include:
- require access to the bootloader monitor or command line
- kernel debug work (using KGDB or KDB, etc)
- want to work on kernel code within a console device (so that, for example, all printk’s appear immediately like printf’s)
- … etc
How to do it
Essentially, to get a console, we require the old-style serial port and a simple RS-232 compatible ‘crossover’ cable – Tx<–>Rx :: target board <–> laptop serial port.
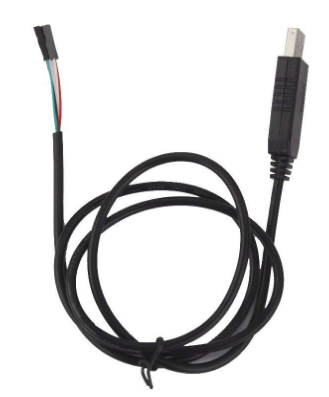
Only one problem: modern laptops (and even PCs) no longer have serial ports; now that’s not an earth-shaking point, we know this. So, of course, USB to the rescue: many USB-to-serial adapter cables exist, allowing us to relive the good ‘ol days! That’s exactly what I did – purchased and setup a nice, cheap and quite reliable little USB-to-serial cable; here are the gory details:
1. Purchased the “Imported USB To RS232 TTL UART PL2303HX Converter USB to COM Cable Adapter Module” from Amazon, India.
2. Relevant technical info on amazon for the product:
“… Description:
Built in TTL COM PC PL2303HX Chip Standard USB type A male and TTL 4 Pin connector
Cable Length: Approx. 1m
Color: Black
Function: Serial communication Router or ADSL firmware upgrade GPS serial communication Hard drive firmware upgrade super terminal in use; Commonly used serial debugging tools All kinds of satellite machine for upgrading
Wiring: Black cable-----GND Green cable-----TXD White cable-----RXDRed cable-------VCCPackage includes: 1x USB to TTL Module"
The “Wiring” line above is what’s important to us..
IMP EDIT: I now realize that one should NOT use the 5V power line (usually the red wire) from the R Pi’s GPIO pin 2 (or 4); just connect the USB-to-serial cable to the R Pi device and the other (USB) end to the laptop/pc *without* connecting any power line. The R Pi has it’s own power after all…
3. For the Raspberry Pi boards, you must do this additional step:
“If you want to use the UART console during booting on a Pi3 then you need to add the line `enable_uart=1` to config.txt [on the SDcard boot partition]. Also, you can use the normal UART pins for other functions without pinctrl getting in the way.”
4. So, lookup the R Pi’s GPIO header (particularly for the R Pi 3 as that’s what we’re using).
Useful ref: Interfacing hardware with the Raspberry Pi
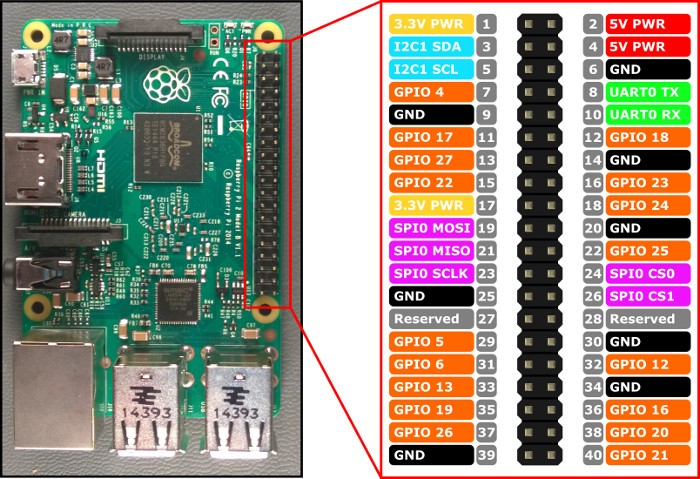
Connect the wires as follows (see the photo below as well):
RPi3 GPIO USB<->RS232 TTL adapter pin# (Func) Color of wire (Func) -------------- ------------------------2 (5V Vcc) Red wire (VCC)6 (GND) Black wire (GND) 8 (UART0 TX) White wire (RXD) 10 (UART0 RX) Green wire (TXD)
First attach the wires to the GPIO ensuring no power is applied to the R Pi device.
(As mentioned above): IMP EDIT: I now realize that one should probably NOT use the 5V power line from the R Pi’s GPIO pin 2 (or 4); just connect the USB-to-serial cable to the R Pi device and the other (USB) end to the laptop/pc *without* connecting any power line. The R Pi has it’s own power after all…


[Above, an UPDATE: 17May21]
Another sketch showing how to connect the serial cable to the board;
Credit: https://ubs_csse.gitlab.io/secu_os/
5. Add a Linux console on the kernel command line:
Update: The Linux consoles on this device typically are:
– /dev/serial0 : soft link (same as) /dev/ttyS0
– /dev/serial1 : soft link (same as) /dev/ttyAMA0
(Backup /boot/cmdline.txt first and then)
Edit the /boot/cmdline.txt to have:
dwc_otg.lpm_enable=0 console=serial0,115200 console=tty1 console=ttyS0 root=PARTUUID=db8dd2db-02 rootfstype=ext4 elevator=deadline fsck.repair=yes rootwait 3
6. (Ref: RPi Serial Connection, eLinux)
6.1 Plug in the USB-to-serial adapter’s USB side to the PC/laptop. We do this first so that the host (laptop) kernel detects the device and assigns it a device node (via udev; typically, /dev/ttyUSB0). Can check this via dmesg: (on my host):
$ dmesg
[...]
[94933.835317] usb 1-1: new full-speed USB device number 8 using xhci_hcd
[94933.984283] usb 1-1: New USB device found, idVendor=067b, idProduct=2303, bcdDevice= 3.00
[94933.984294] usb 1-1: New USB device strings: Mfr=1, Product=2, SerialNumber=0
[94933.984302] usb 1-1: Product: USB-Serial Controller
[94933.984308] usb 1-1: Manufacturer: Prolific Technology Inc.
[94933.986152] pl2303 1-1:1.0: pl2303 converter detected
[94933.987003] usb 1-1: pl2303 converter now attached to ttyUSB0
6.2 On the PC/laptop, in a terminal window run a terminal emulator app – typically, screen or minicom (there are other choices as well, though am happy with minicom).
6.3 Setup the terminal emulator serial parameters correctly:
115200 8N1, Hardware and Software Flow Control Off.
For minicom: Ensure your login belongs to the ‘dialout’ group:
(One-time):
sudo usermod -a -G dialout username
sudo minicom -b 115200 -o -D <Port_Name>
   ; where Port_Name is usually /dev/ttyUSB0
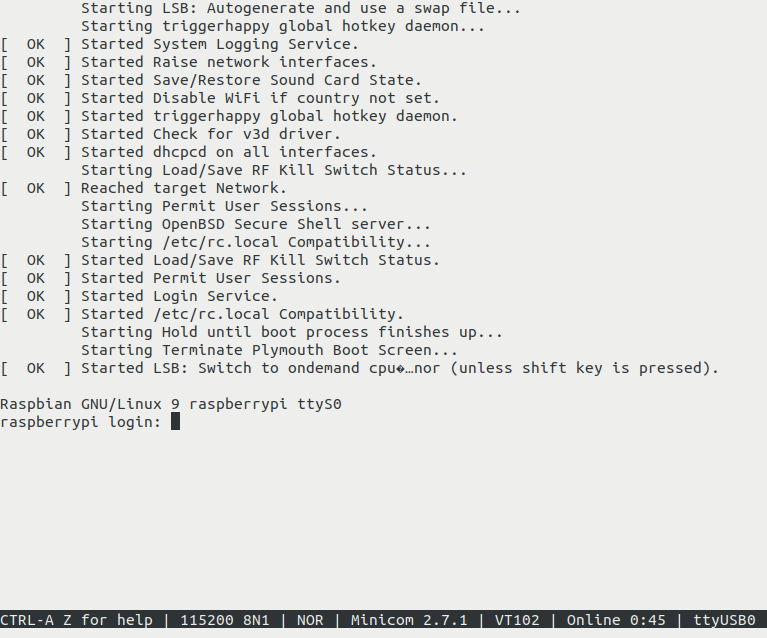
If all okay, you should see the login (agetty) prompt from the Raspberry Pi (and, if you did it fast enough, the console printk’s from the kernel as it boots). Login defaults for Raspbian: username: pi, default pswd: raspberry.
Tips:
- In my experience, using just the USB rail for power to the R Pi causes unstable behavior; it reboots all of a sudden. So, attaching up a good 3.0A power supply (via it’s miniUSB port) is important. EDIT: do NOT use the red wire for power, just use a good external power supply
- Minicom settings menu: Ctrl a+z
- Ref: “Setting Up Raspberry Pi Headless – The way which doesn’t sucks”, Ayan Pahwa’s blog